

Flat roof leaks often start at an open seam, loose flashing around a pipe, or a low spot where water sits after a storm. Those details help determine how well a TPO roof protects your building.
If you own a warehouse, store, school, or office, this guide to TPO roofing in Columbus, IN, walks you through each part of the job. It covers membrane choice, welded seams, attachment, flashing around pipes and rooftop units, and drainage. If you’re comparing full-service TPO roofing proposals, ask what each one covers from the initial inspection through the final review. Have a question about your building? Call Outdo Commercial Roofing at 574-536-2823.
What Is TPO Roofing?
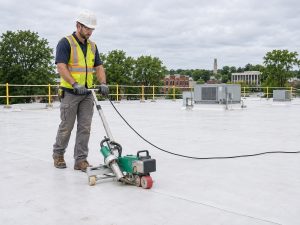
TPO stands for thermoplastic polyolefin. It’s a single-ply roofing membrane, meaning one layer of membrane covers the roof assembly. Reinforced TPO contains a fabric layer called a scrim that adds strength. The sheets come in rolls and are joined on the roof with heat.
The Sheet vs. the Install: What Keeps a TPO Roof Dry
White TPO reflects sunlight, and the membrane is designed to withstand UV exposure. Any cooling savings depend on the building, its insulation, and the climate. Recycling options depend on whether a program accepts the material.
Four installation details make a difference:
- Seams: Welds should be continuous and checked for gaps.
- Attachment: Fastener spacing or adhesive coverage should match the approved roof assembly.
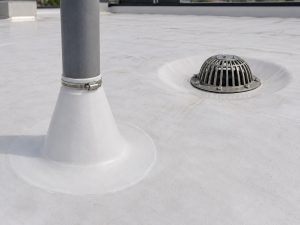
- Flashing: Pipes, curbs, and drains need details that keep water from getting under the membrane.
- Drainage: Slope and clear drains give water a path off the roof.
Use these same points to compare proposals for a Columbus warehouse or a TPO roof installation in Evansville, IN.
Choosing the TPO Membrane
TPO thickness is measured in mils. One mil is one-thousandth of an inch. Common options include 45, 60, and 80 mil. Compare thicknesses within approved roof assemblies and consider how often technicians access the roof, the building’s exposure to hail, and whether service paths need walkway pads.
Seams: Why Weld Quality Matters
A hot-air welder heats the overlapping edges of two sheets so they fuse together. Heat, travel speed, and a clean welding surface all affect the bond. The membrane manufacturer’s instructions guide how to test and check the welds.
- Make a test weld: Weld a sample, let it cool, and peel it apart to check the bond. Adjust the settings and repeat the test if the sample doesn’t meet the manufacturer’s criteria.
- Probe cooled seams: Run a seam probe along the edge to find gaps or unbonded areas.
- Check weld width: Follow the manufacturer’s minimum weld width for the system.
- Repair and recheck: Correct weak spots using the approved method, then recheck the repaired area.
How the Roof Is Held Down
Before the membrane goes down, the surface below it needs to be sound, clean, and dry. Wet or damaged insulation needs to be addressed before installation.
Mechanically Attached
In a system fastened at the seams, screws and plates secure the sheet to the deck. The next sheet overlaps the fasteners and is welded in place. Fastener spacing follows the approved assembly and the building’s wind design. Corners and edges may need closer spacing.
Fully Adhered
The membrane is bonded to a compatible insulation board or cover board. Wind performance depends on the entire assembly, including how the underlying boards are secured, how adhesive is applied, and how the perimeter is detailed. Adhesives have application temperature limits, so cold weather can affect scheduling.
Induction Welded
Special plates are fastened beneath the membrane. An induction tool heats each plate so it bonds to the underside of the sheet without putting a fastener through the exposed membrane.
What Guides the Choice
The roof deck, building height, wind exposure, and approved assemblies all help determine which attachment method fits. A steel deck may suit a mechanically attached assembly. A fully adhered assembly can also meet wind design requirements when the complete system is approved for the building.
Penetrations: A Common Leak Point
Pipes, vents, drains, and rooftop equipment interrupt the roof surface. Each needs a compatible detail that keeps water from reaching the layers underneath.
- Pipe boots: Preformed TPO boots fit standard round pipes. The base is welded to the membrane.
- Curbs: Flashing runs up the raised frame around an HVAC unit and is secured at the top according to the system detail.
- Odd shapes: Field-fabricated flashing or a sealant pocket may suit an irregular penetration when the roof system allows it.
Flashing welds should be checked after they cool, following the manufacturer’s instructions.
Drainage: Getting Water Off the Roof
Flat roofs need enough slope to move water toward the drains. Substantial water still on the roof about 48 hours after rain is a warning sign. Check the drainage requirements for your roof system and warranty.
- Tapered insulation: Boards that are thicker on one end create slope toward drains.
- Crickets: Small sloped sections direct water around rooftop units and other obstructions.
- Drains, scuppers, and gutters: These provide outlets for runoff and need to stay clear.
Columbus roofs face spring storms and winter freeze-thaw cycles, so check how the proposed roof will drain around equipment, along walls, and at low points.
What to Confirm Before the Job Is Done
Before work starts, confirm which checks and documents are included at closeout:
- How seam checks and any repairs will be documented
- Whether photos of flashing at pipes, curbs, and drains are included
- How the contractor will review the drainage paths before closeout
- What manufacturer warranty paperwork applies to the selected system
Ready to plan your roof? Learn more about Outdo’s single-ply roofing services, call 574-536-2823, or contact us online to schedule a roof inspection and quote.
Frequently Asked Questions
1. How long will a TPO roof last in Columbus, IN?
There’s no single number. Service life depends on the roof assembly, installation, weather exposure, drainage, and maintenance. Compare warranty terms for coverage and exclusions. A warranty term doesn’t predict exactly how long the roof will last.
2. What helps a TPO roof hold up in Indiana weather?
An attachment pattern designed for the building helps resist wind uplift, especially at corners and edges. Sound flashing, adequate slope, and clear drains help the roof handle rain and winter weather.
3. Can TPO go over my old roof?
Sometimes. The existing roof and deck need to be suitable for a recover, and the proposed system must meet local code and manufacturer requirements. Check for trapped moisture and damaged materials before deciding whether to recover or tear off.
4. What thickness of TPO should I choose?
Compare options such as 60 and 80 mil within approved roof assemblies. Rooftop service traffic, hail exposure, and the assembly’s ratings can all affect the choice. If technicians regularly access the roof, ask about walkway protection as well.
5. How do I know my TPO seams are welded right?
Ask how the crew verifies its welder settings, probes cooled seams, and corrects any gaps or weak spots. The weld should meet the manufacturer’s requirements. Confirm what documentation the contractor will provide at closeout.
6. How long does TPO installation take?
Timing depends on roof size, whether the project involves a tear-off or recover, the weather, and the number of pipes, drains, and rooftop units that need flashing. Temperature limits for adhesives can also affect the schedule.